OneDrive connector for home map points
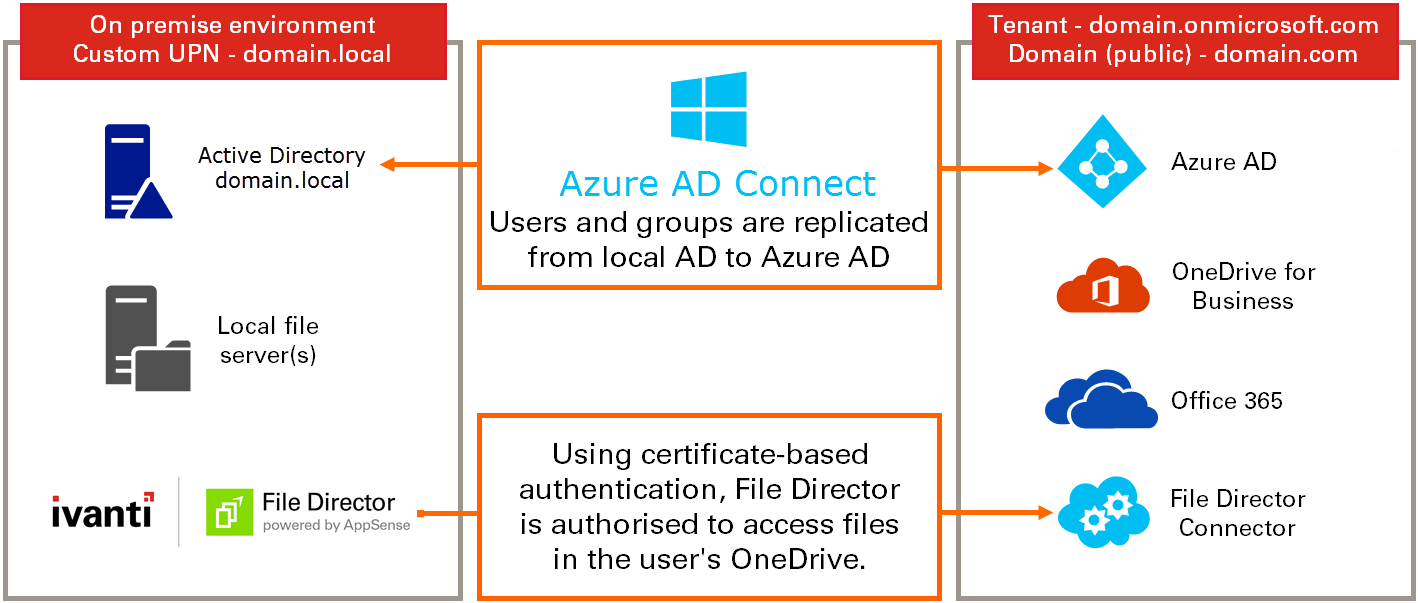
Configure Azure Active Directory (Azure AD) and the File Director Admin console to use OneDrive accounts as the storage location for user's home map points. File Director can then utilize the 1TB of storage, included free of charge, with each Office 365 for Business license. Once configured, users can update files on map points using File Director and OneDrive clients. All changes are synchronized with the File Director server so the files are up-to-date, regardless of the client used to edit or view them.
You can create multiple application IDs when connecting to the SharePoint Online API. This enables you to create an application ID for each appliance in your File Director cluster, and so improves connector efficiency.
Video: File Director - Overview of cloud storage using OneDrive
In this section:
•Configure (2019.1 SP1 or later)
•Configure File Director (2019.1 or earlier)
•Renew your App Registration Certificate
Prerequisites
- Your perimeter firewall must allow communication to <instancename>-my.sharepoint.com on port 443 and Microsoft supplied URLs detailed in this article.
- You are an Office 365 administrator.
- Your public domain is associated with your Azure AD instance.
- You know your Azure tenant name - typically, this takes the form of: <customer name>.onmicrosoft.com.
-
The local AD user name (User Principal Name or UPN) must match the one used to sign into Azure.
Note, any mismatch will result in the user being unable to connect to OneDrive storage from File Director. -
Each user’s Personal Site (within the SharePoint Admin Portal) should correlate with the user’s UPN – note that in SharePoint special characters are replaced with underscores (_).
Example: Username [email protected] would translate to /personal/john_doe_test_com - Users have an Office 365 license assigned to them from the Office 365 Admin Center.
-
Users have OneDrive storage provisioned.
For further information about how to pre-provision OneDrive for Business for your users, refer to this Microsoft documentation.
For further reading about integrating applications with Azure AD, see the Microsoft documentation.
Supported file types
There are a number of file types which cannot be supported by the File Director cloud connectors. Microsoft OneNote files that are saved without a file extension cannot be opened and are excluded from file listings. (This can occur when notebook files are created using Office 365 via a browser.)
Microsoft have published a list of invalid file names and file types for OneDrive. It is available here.
Step 1 - Create your Azure AD application and grant permission to access OneDrive storage
- Login to Azure AD Admin Center as Office 365 Administrator.
-
In the sidebar menu click All Services > App Registrations.
-
In the App registrations dashboard, click New registration.
-
Enter an appropriate name for the application, and ensure the default supported account type is selected: Accounts in this organizational directory only.
Click Register at the bottom of the dialog.
-
An application ID is generated and displayed.

Copy the Applications (client) ID to your clipboard.
You will be required to enter the application ID at a later stage in the setup.
Configure permissions for the appliance
This stage of the setup determines what the application is allowed to do and what it can access.


1.Click API Permissions> Add a Permission.
2.In the Request API Permissions dialog, click the APIs my organization uses tab.
Enter office 365 into the search box to find Office 365 SharePoint Online.
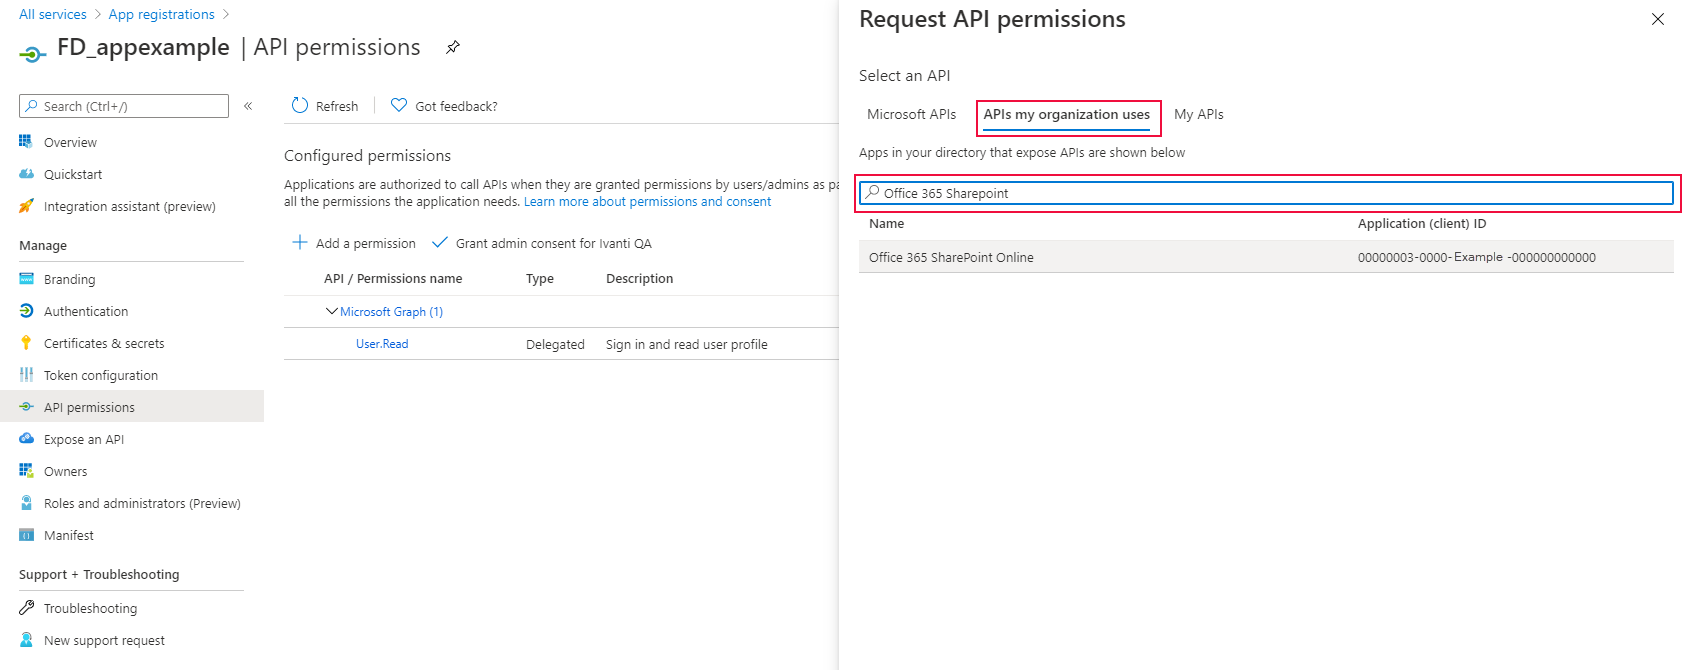
3.Click Office 365 SharePoint Online > Application Permissions.
4.In the Request API permissions dialog, click the Permission types listed to view each option. Select the permissions required then click Add Permissions at the bottom of the dialog.
To set the minimum permissions required for the File DirectorOneDrive connector, select only Sites.ReadWrite.All.
If further permissions are added automatically within Azure, we recommend these are removed.

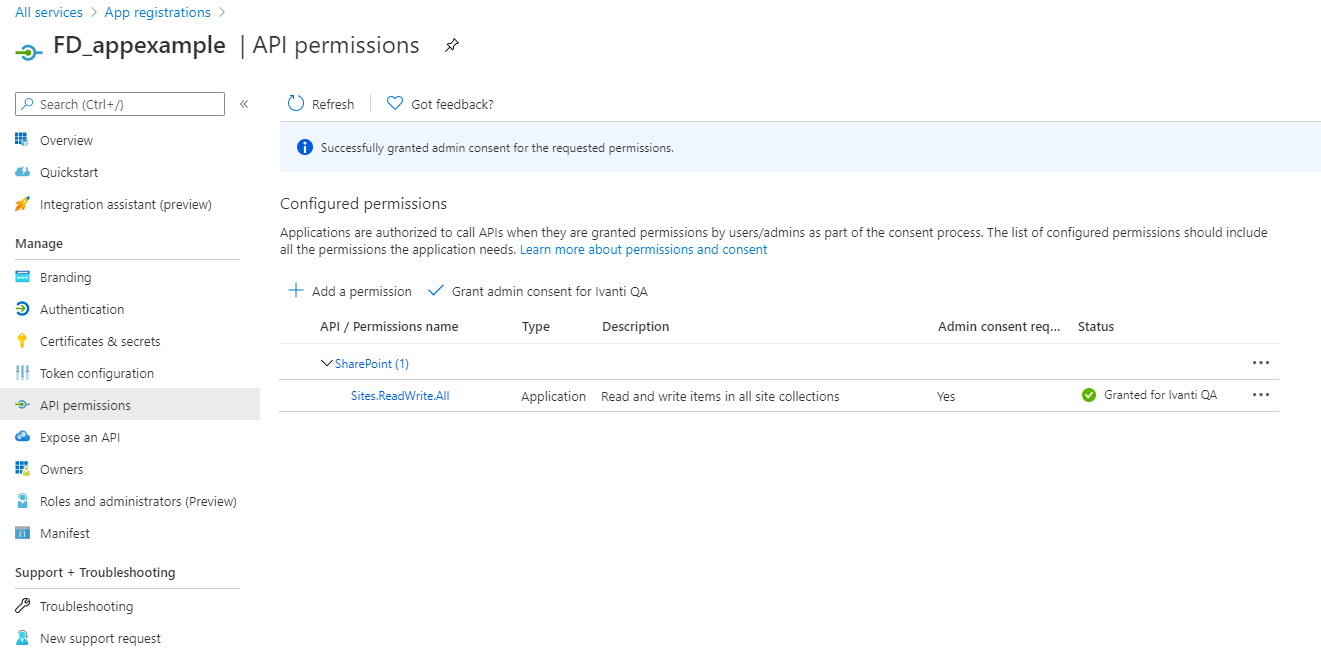
5.Having added the required permissions, you need to provide Administrator consent for them.
In the API permissions dialog, click the button Grant admin consent for <Azure AD account>.
In the confirmation dialog displayed, click Yes.

This action permits access to OneDrive storage for your named application.
6.Confirmation of your consent is displayed:
Step 2 - Configuring File Director
The next step is to go to the File Director console to generate a certificate that can be used to authenticate with OneDrive. Authentication uses public key infrastructure to generate a self-signed certificate in the server and uploads the public key to Azure. Applies to File Director 2019.1 SP1 and later
One Drive Registration
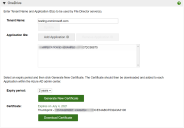
1.In the File Director web Admin console, select Configuration > Cloud Connectors.
2.If required, click OneDrive to expand the OneDrive dialog.
3.Enter the Tenant Name - this is the custom domain name configured in Azure AD.
Note, to update the tenant name, enter the name required and click Update. This updates the current configuration, retaining other details configured previously.

4.Click Add Application ID to display the Add Application ID dialog.
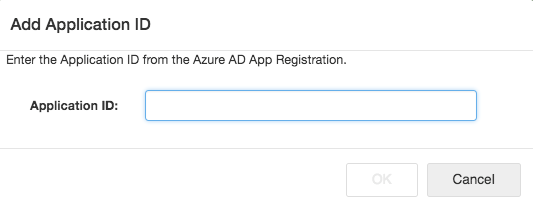
5. Enter the Application ID for the app - this is the application (client) ID you copied from Azure AD, then click OK.
A new app must be created in Azure for each Application ID you want to use.
Note that each File Director appliance will only ever use one application ID.
6.Repeat steps 3 and 4 until all app IDs have been added.
7.Select an Expiry period; 1 or 2 years.
8.Click Generate New Certificate.
The certificate is generated and a thumbprint is displayed.
If you have a number of certificates in use, the thumbprint can be a convenient identifier within the Azure portal and helps to ensure the correct certificate is selected.
9.Click Download Certificate.
The public certificate file is downloaded in PEM format. It will be named fdod4b_cert.pem.
10.In the Azure AD App Registrations portal, click Certificates & secrets in the sidebar menu then click the Upload certificate button.
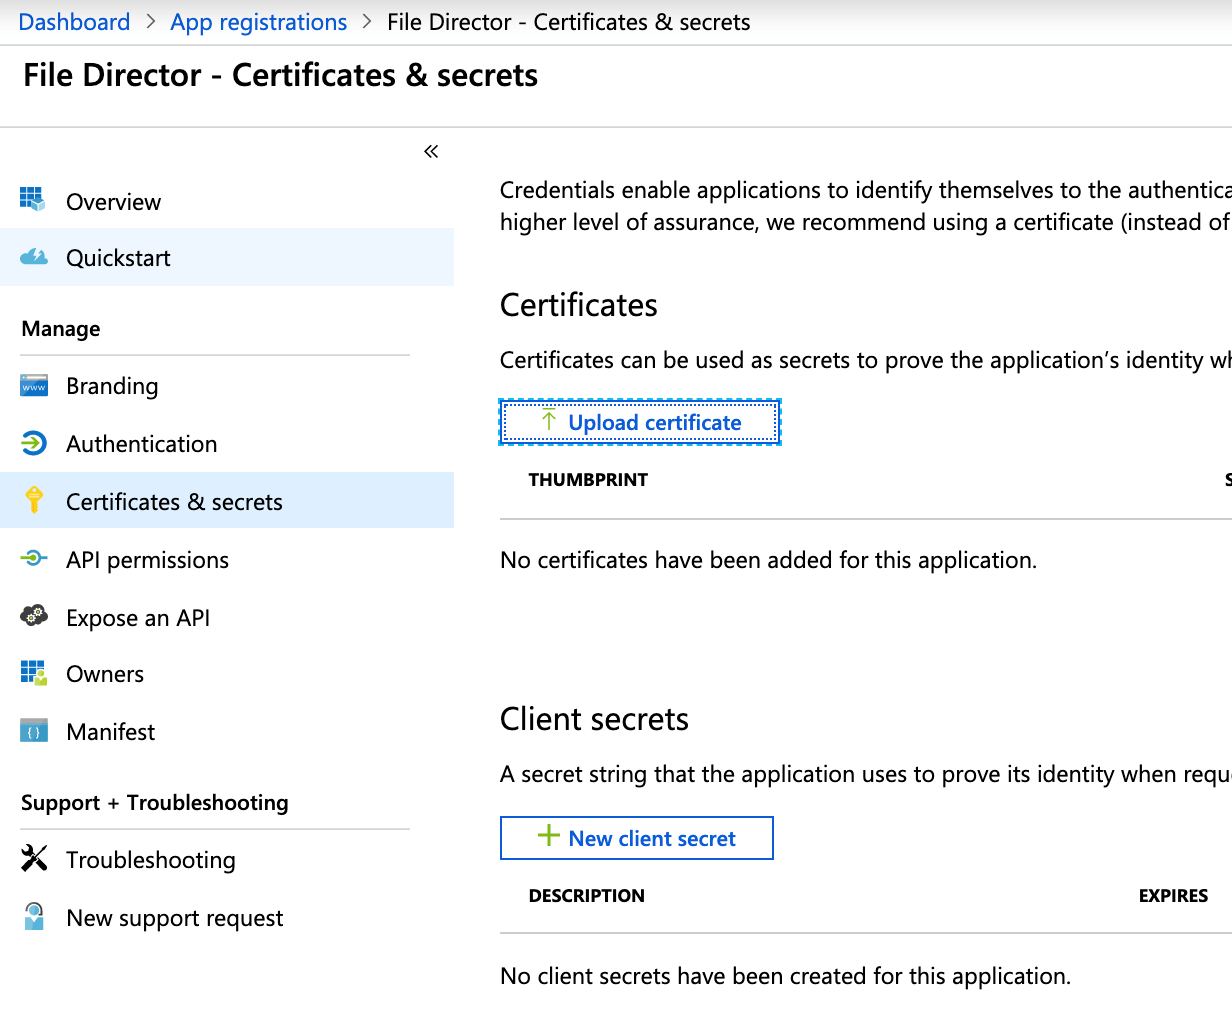
11.In the Upload certificate dialog, click the folder icon to locate and select the .pem file you created earlier, click Open, then click Add.

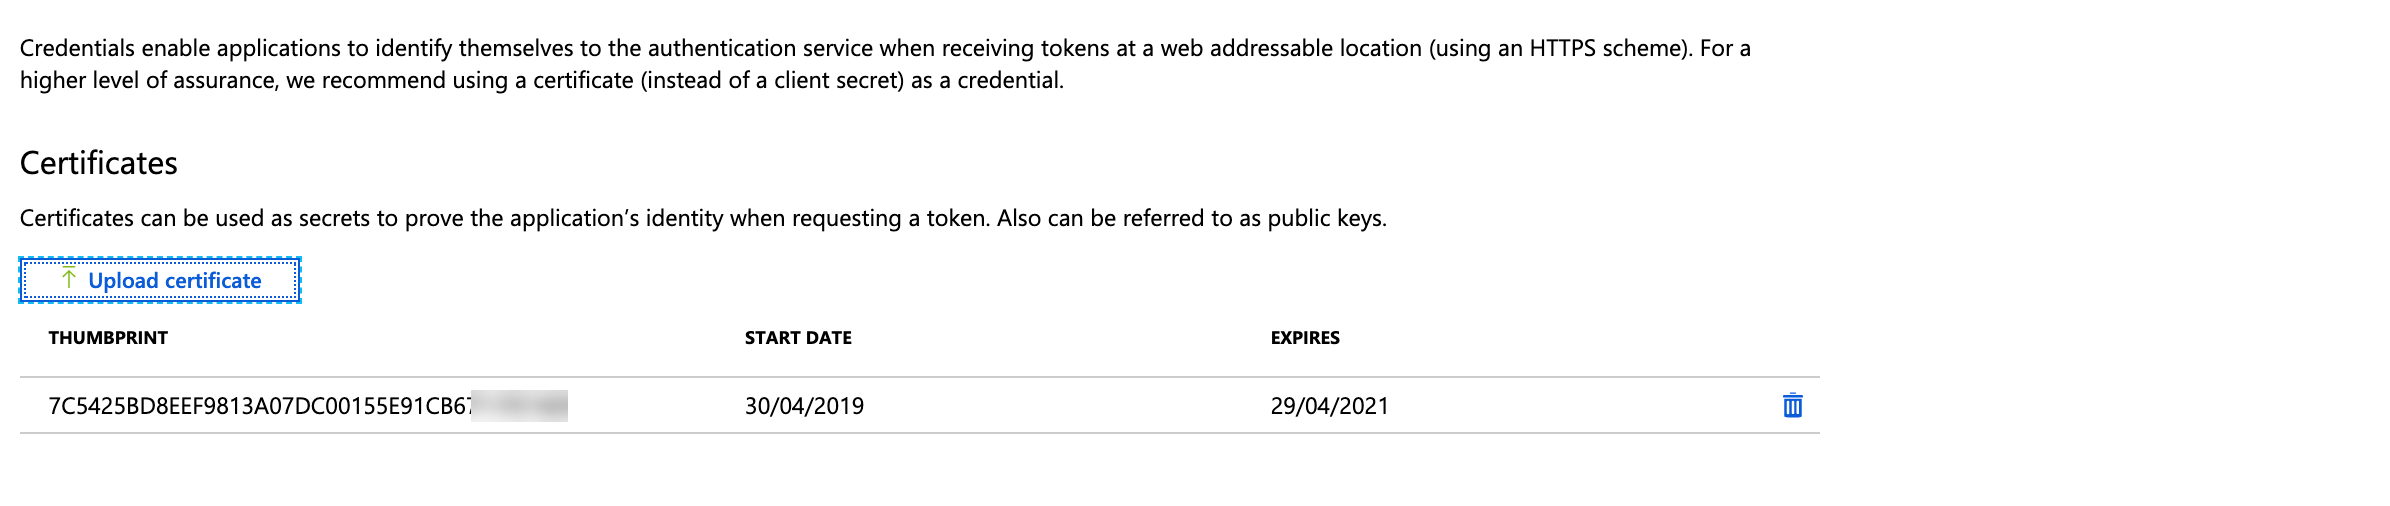
12.The thumbprint of the certificate is now listed in your application.
Your cloud connector for OneDrive is complete. You can now create a OneDrive home map point and then assign an access policy for users as required. See Map Point Configuration.
When configured, users access their Home folder, and will save to their OneDrive storage - there is no impact on their File Director user experience.
OneDrive will display files that have been saved to the user's File Director home map point. A folder named _filedirector_ is also created in the root of user's OneDrive storage. This folder stores creation times, modified times, and other metadata.
This uses public key infrastructure to generate a self-signed certificate in the server and upload the public key to Azure as part of a manifest.
Copy the app ID
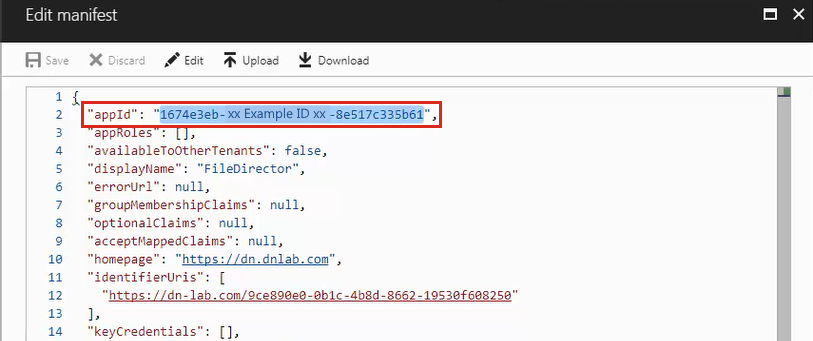
1.Click Manifest for your Azure AD application.
The manifest displays.

2.Copy the app Id from the manifest and save it to Notepad - you need this to generate data for the manifest.
One Drive Registration
- In the File Director web Admin console, select Configuration > Cloud Connectors.
- Enter the Tenant Name - this is the custom domain name configured in Azure AD.
- Click Add Application ID to display the Add Application ID dialog.

- Enter the Application ID for the app - this is the app Id you copied from Azure AD and click OK.
A new App must be created in Azure for each Application ID you want to use.
- Repeat steps 3 and 4 until all app Ids have been added.
- Select an Expiry period; 1 or 2 years.
- Click Generate.
The data you need to add to the manifest is generated.
- Click Copy to copy the data to the clipboard. You can save this to a text editor if you are not going to edit the manifest immediately - if you are, just leave it on the clipboard.
In Azure AD, Locate the keyCredentials class in your manifest and paste the data you copied from the File Director web Admin console between the square brackets.
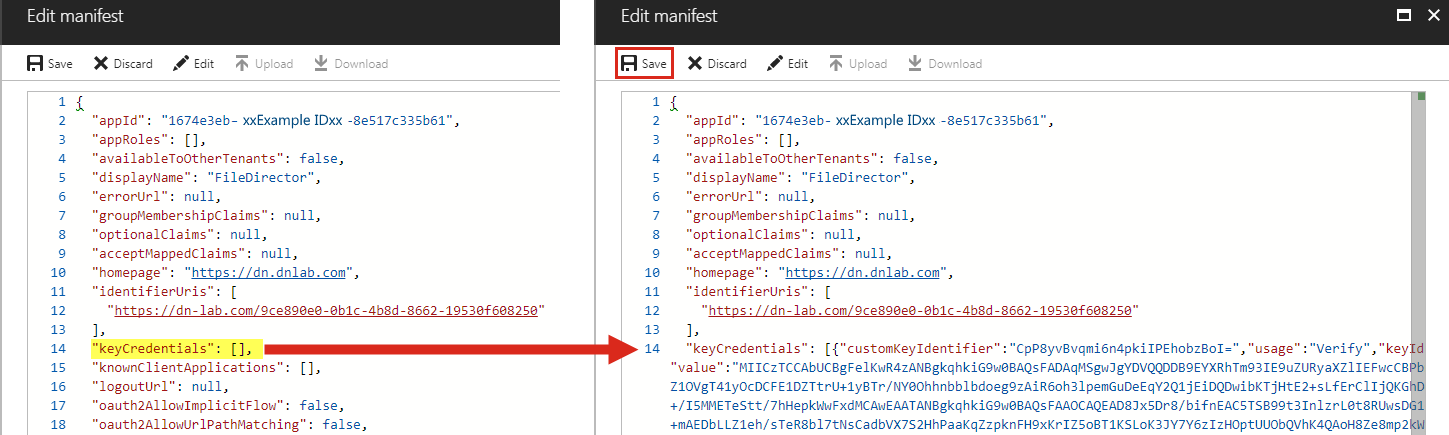
- Click Save
You need to configure the AD setting. The local AD is used for authentication but must be in sync with Azure AD. For further information, see Configure the Active Directory connection.
Renew your app registration certificate
Your OneDrive app registration certificate within Azure AD will expire every 1 year or 2 years so it will require renewing periodically. The certificate renewal process comprises several steps:
Step 1 - Enable File Director maintenance mode
Placing File Director in maintenance mode prevents server traffic. This means that any clients that try to connect whilst the certification renewal process takes place will not experience revoked access or be presented with error messages
1.From the File Director admin console, click Cluster.
2.In the Cluster Status view, click the menu icon and select Disable All Nodes.
This action clears the Enabled checkbox for each node, and the status for each node is displayed as In maintenance mode.
Step 2 - Take File Director configuration backup
1.From the File Director admin console, click Backup and Restore.
2.In the Backup Appliance Configuration section select the Configuration only checkbox.
Note, this selection is recommended unless you are using File Director 2020.3 or earlier and require user and devices data to be included (for example, if you use verified devices or remote wipe functionality).
3.Click Download Snapshot.
The backup data file is downloaded.
Step 3 - Generate new OneDrive connector certificate in File Director
1.From the File Director admin console, click Configuration > Cloud Connectors.
2.If required, expand the OneDrive section.
Your current cloud connector app data is displayed: Tenant name, Application ID, Certificate status and thumbprint.
3.In the Expiry period field, click the drop-down arrow and select the expiry period required, then click Generate New Certificate.
The certificate file is downloaded.
Step 4 - Upload the certificate to Azure
Note, for an illustration of the certificate upload process, refer to the OneDrive Registration section above.
1.In the Azure AD App Registrations portal, click Certificates & secrets in the sidebar menu then click the Upload certificate button. (If required, refer to the previous sections for more detailed navigation instructions).
2.In the Upload certificate dialog, click the folder icon to locate and select the certificate (.pem) file created. Click Open, then click Add.
3.The thumbprint of the new certificate is added to your application Certificates list.
Step 5 - Delete the old certificate in Azure
1.From your application Certificates and secrets page in Azure, select the certificate you want to delete from the Certificates list.
2.Click the delete icon. When prompted, confirm you wish to delete the file.
The application credentials are updated within Azure and a confirmation notice is briefly displayed..
Step 5 - Test your web client connection to OneDrive
Check that your web client can continue to access the OneDrive home map point as expected. If you have many nodes in your cluster it is prudent to test this from a sample of nodes.
Step 6 - Re-enable your File Director cluster
1.From the File Director admin console, click Cluster.
2.In the Cluster Status view, click the menu icon and select Enable All Nodes.
This action selects the Enabled checkbox for each node, and the status for each node is displayed as Enabled.